Pro Certs Electrical Certification Software User Guide and FAQ’s
This page is dedicated to offering guidance and support for the Pro Certs Electrical Certification Software with answers to common questions in the FAQ’s section below.
If you cant find what you are looking for on this page then contact us with your query and we shall get back to you as soon as we can.
Guidance Notes
We continue to enhance the existing certificates and develop new ones, all future added certificates will be included with a free update.
For certificates based on BS 7909 see 7909 Certification Software.
For Landlords Electrical Interim Inspection Software see Interim Visual Electrical Inspection Software.
Feel free to contact us if you would like to request a new certificate type or form which is not listed below.
Included Certificates:
Electrical Certificates based on BS 7671:
- Electrical Installation Certificate.
- Electrical Installation Condition Report.
- Electrical Minor Works Certificate.
Emergency Lighting Certificates based on BS 5266-1:
- Emergency Lighting Completion Certificate (For small installations).
- Emergency Lighting Completion Certificate (For large installations).
- Emergency Lighting Existing Site Compliance Certificate.
- Emergency Lighting Periodic Inspection and Testing Certificate.
Other Certificates:
- Fire alarm certificate based on BS 5839-6 (domestic).
- Ventilation certificate based on Part F of the Building Regulations
Coming Soon:
- Fire alarm certificates based on BS 5839-1 (non-domestic).
- Yet to be publicised… watch this space!
You can also tab through each page using the footer (bottom of the screen) tabs.
EICR Observation Images
Add photographic images to add weight to your EICR observations.
There are a number of ways to add an observation in an Electrical Installation Condition Report.
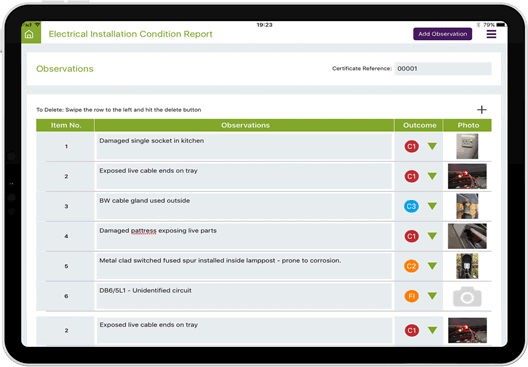
1) General Observations
At the top of each page tap the “Add Observation” button to add a general observation.
2) Circuit Observations
For observations related to a specific circuit, within the circuits screen tap the cog icon against the circuit you want to add the observation to, and select option “Add Observation”, this will automatically prefix the observation text with the corresponding circuit number, for example DB2/5L1: {your comment}.
3) Schedule of Items Inspected
If you select an item outcome as a C1,C2 or C3 this item will be automatically added as an observation. As you can add remarks (your own comment) against a Schedule of Item Inspected item, this remark will also be included in the automatically added observation.
Main DB screen:
On the main DB screen (i.e. DB 1), enter the details for that DB, such as the DB reference and location, associated RCD (if applicable) and SPD details (if applicable).
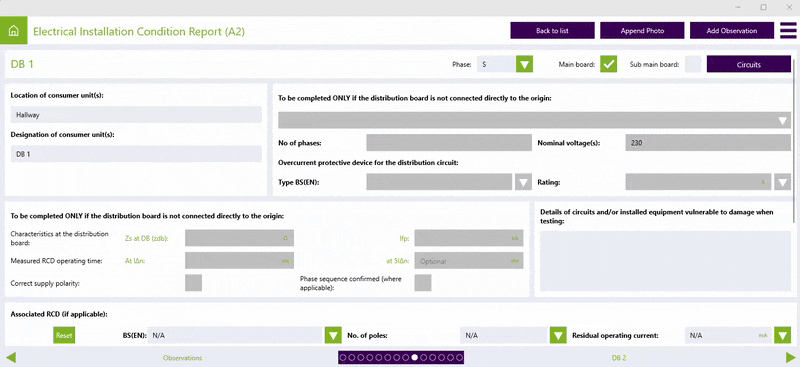
Accessing the actual circuits:
To access the circuits for the DB, click the top purple “Circuits” button, then the “Circuit (Details)” screen will be displayed.
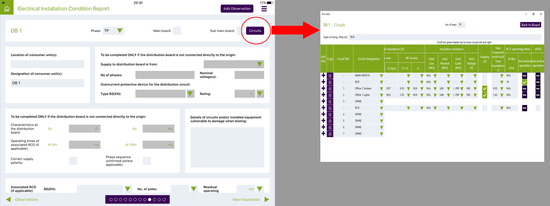
Adding circuits:
Once in the circuits screen you can add more circuits by clicking the top “Add Circuit(s)” button to enter the number of circuits you want to add.
Entering circuit test results:
Tap the top green “Circuit Tests” button to tab from the “Circuits (Details)” screen to the “Circuits (Test Results)” screen.
Within the certificate “Sections” menu, for the DB’s, you can copy, add new or reorder the order of the DB’s to the order you want them to be printed in on the PDF file, click on the cog icon to view the options.

The account holder can (from within the Management Web Portal) lock and unlock the In-App Settings screen for all of your app users.
To unlock or lock the In-App Settings:
Home > Sidebar Menu, Company Settings =
- Check (tick) the option “Engineer can change settings” – this text is soon to be updated to “Unlock the in-app settings for all app users”.
- Check (tick) the option “Update the settings for all users?” – this text is soon to be updated to “Push these settings to all devices”.
- Click Save.
App users will need to sync their app to pull down any setting changes to their device.
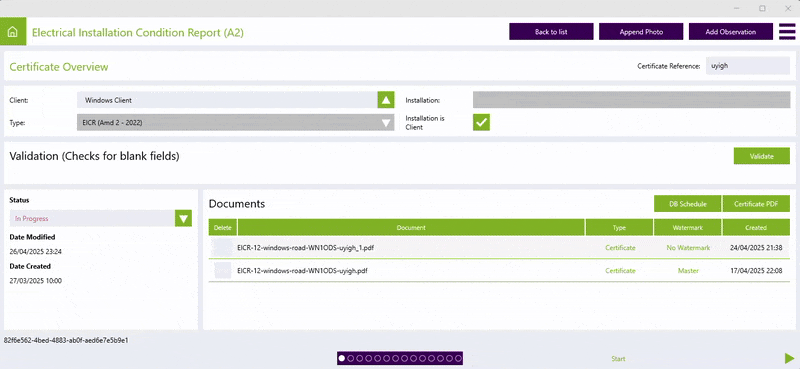
We strongly recommend you save all your generated certificate PDF files in a backed up location off your device in case of a device failure or malfunction resulting in data loss.
To generate the certificate PDF file:
- From the “Home” screen, navigate to “My Certificates”.
- In the “My Certificates” screen, select a certificate and option “Open Certificate”.
- In the “Certificate Overview” screen, click/tap the green “Certificate PDF” button in the Create PDF section.
- You will be asked if you wish to add a watermark overlay to the PDF file.
- Select an option: “Save PDF”, “Email PDF” or “Share PDF”.
The save and share options offered after selecting an option in step 5 will depend on your device capabilities.
If you purchase a subscription(s) via the Management Web Portal with PayPal, once the purchase transaction has completed, you then need to allocate the subscription(s) to specific users.
Allocating Subscriptions:
Within the Management Web Portal, navigate to “Users & Settings“, click the green edit icon against the user to whom you wish to allocate the subscription to.
Then for, “Subscription by renewal date“, select a subscription from the drop down options, and save.
Anything not included in the above is likely covered in the FAQ’s below.
FAQ’s
Frequently asked questions and further guidance.
Further Information
If you have a valid app store subscription purchased directly from the Google Play Store, Apple App Store or the Microsoft Store (via an in-app purchase), but the app is still asking you to subscribe, then you may need to restore your subscription.
Restore App Store Subscriptions:
Click the green “RESTORE SUB” button.
